Wednesday, September 28, 2022

Be Creative with Your Second Harvest.

 As the cooling rains fall, the dust is washed away from every surface it touches.  The soil is pounded down while greedily sucking up every moist drop that it can contain.  Cold weather plants plead to live for one more month, while less resistant ones struggle to stay upright.  Yes, the season of autumn has taken the throne, and we must do its bidding.

The plants in our vegetable garden have granted us one more abundance for harvest.  The last picking of tomatoes, peppers, zucchini and yellow squash; and their mothering plants transferred to the compost bin.   Unfortunately, not enough for processing for winter storage, but enough to create salsa for this weekend’s anime marathon.  Plus, two meals popping with colors of green, red and yellow; Greek inspired vegetables, and a cheesy, vegetable loaded frittata.  I look at this as a prequel to when the leaves will be displaying their fall vibrant array.


Greek Inspired Vegetables

 Ingredients:

1 large zucchini

1 large yellow squash

1/8 cup olive oil

½ cup cherry tomatoes which were cut in half

1 tsp. crushed Greek oregano

½ tsp. ground black pepper

Feta cheese, crumbled

Preparation:

Preheat oven to 350F; line a baking sheet with aluminum foil.

Slice the zucchini and yellow squash diagonally, place on top of foil, in single layers.  Drizzle oil over slice, and bake for 20 minutes.

Remove vegetables to serving platter, top with tomatoes, and sprinkle with oregano and black pepper.  Sprinkle with crumbled Feta cheese, to taste (we like plenty of it!).

This can be served as a meal, serving two; or as a side dish

The next recipe is for a cheesy, veggie loaded frittata.  What is frittata? Frittata is an egg dish similar to an omelet or a crustless quiche.  It can contain ingredients such as meats, cheeses, vegetables or pasta, and can be flavored with herbs and/or spices.  A frittata can be baked, but is mainly made in a skillet. When started on a stove top the frittata can be finished off in an oven, under a broiler, or flipped and finished in the pan.  The flipping technique can be daunting, especially if attempting the “up in the air” flip.  The easiest way is to slide the frittata onto a large plate, place another plate over top, flip, and then slide back into the skillet.  Or place the skillet over the plate, and then flip it over, altogether.  Of course, with the second option, you have to be very careful doing it, as the skillet will be burning hot; oh, and remove the plate before finishing the cooking process.

Frittata preparation differs from omelet preparation in that the eggs are beaten with water, milk or cream to incorporate more air, where the eggs for omelets are less airy. The additional air in the frittata mixture allows for a deeper filling and a fluffier result. Additional ingredients are added to the pan after the egg mixture, and before the eggs are fully cooked.

A frittata is usually divided into slices, and while it can be served as a meal by itself, a salad, or other side dish, can be added.


Cheesy, Vegetable Loaded Frittata

Ingredients:

6 eggs

3 Tbsp half n’ half

3 Tbsp. butter

½ cup each julienned red bell pepper, green bell pepper; thinly sliced zucchini, and peeled, thinly sliced yellow squash

3/4 cup shredded sharp cheddar cheese

1 tsp. fresh, minced tarragon (used crushed, dried if fresh not available)

¼ tsp. salt

1/8 tsp. ground black pepper

Preparation:

In small bowl, whisk together eggs and half n’ half; set aside.

In a 10-inch, non-stick, skillet, on medium heat, melt butter and sauté all vegetables together, about 5 minutes; remove to bowl.   In same skillet, pour in egg mixture and let eggs cook for 5 minutes; do not stir. Distribute the vegetables, cheese, tarragon, salt and pepper evenly throughout the partially cooked eggs; let cook another 5 minutes.

Slide the frittata onto a plate, cover with another plate and flip over; slide it back into the skillet and let cook another 5 minutes. Slide frittata onto clean serving platter, cut into wedges, either 4 or 6, to serve.

 Makes 4-6 servings.

 Mary Cokenour

Wednesday, September 21, 2022

Oh My, She’s Baking Again.

It happens to be apple picking time, and remember my article, in The San Juan Record, May 18, 2022, about preserving apples for future usage?  One item happened to be homemade apple pie filling, chock full of cozy winter spices.

Now talking about cozy winter spices, another favorite is gingerbread, but the majority of bakers stick to decorated cookies, and creating artistic houses too pretty to eat.  In the Shrek movies, the poor little gingerbread man was constantly running from someone trying to eat him.  Well, I am going to pull a Marie Antoinette and say, “Let them eat cake!”

I have introduced author, Karen Rose Smith, to all of you once before.  She is a prolific writer of romance, and cozy mystery, novel series.  She lives in Hanover, Pennsylvania, and so, like I used to do, frequents the many farmers markets throughout Lancaster and York counties.  Hanover is famous for the pretzel company, Snyder’s, created in 1909 by baker, Harry Warehime.  From Hanover, it is only about a half hour ride to one of my favorite haunts (pun intended), Gettysburg National Cemetery and Park.

Back to Karen, while her Daisy’s Tea Garden mystery series takes place in Pennsylvania Amish country, namely Lancaster County; another series, Caprice De Luca mysteries takes place in York County.  I have read both, enjoyed both series, namely as it brings back very fond memories of my almost 20 years living in Lancaster, PA.

What has this to do with gingerbread?  Karen’s books, at their ending, contains a few recipes of dishes mentioned throughout each mystery, and here is one on gingerbread.


Apple Gingerbread

(Murder with Clotted Cream (A Daisy's Tea Garden Mystery Book 5) by Karen Rose Smith, page 309)   

Ingredients:

1 cup sour cream

¾ cup dark brown sugar

⅓ cup dark Karo syrup (substitutes =amounts molasses, maple syrup, honey)

¼ cup water

2 eggs

2 tsp. baking powder

1 tsp. baking soda

⅛ tsp. salt

2 tsp. ground cinnamon

2 tsp. ground ginger

2 and ½ cups flour

2 cups diced apples

Instructions:

Grease and flour two 8-inch cake pans (unless they are nonstick.)

Preheat oven to 350 degrees.

In mixer, beat sour cream, brown sugar, and Karo syrup. Add water.

Beat in eggs, baking powder, baking soda, salt, cinnamon, and ginger. Mix in flour little by little until batter is smooth.

Stir in apples and pour evenly into both cake pans.

Bake for 20 to 25 minutes until a toothpick poked into the center of each cake comes out clean.

Serve with a dollop of clotted or whipped cream.

What is clotted cream? 

Clotted cream is a thick cream made by indirectly heating full-cream cow's milk using steam or a water bath and then leaving it in shallow pans to cool slowly. During this time, the cream content rises to the surface and forms "clots" or "clouts", hence the name. It forms an essential part of a cream tea.  (Wikipedia definition)

Place of origin: England

Alternative names: Clouted cream, Cornish cream, Devonshire cream

Clotted cream is rich and sinfully decadent.  If you cannot find it in a store, I suggest online shopping at the English Tea Store (https://www.englishteastore.com/) for all items of the British realm.  Browse through the various departments, and a whole new world of culinary adventure awaits you!


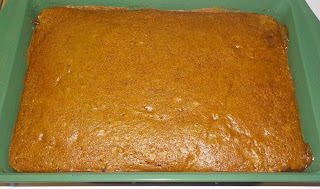
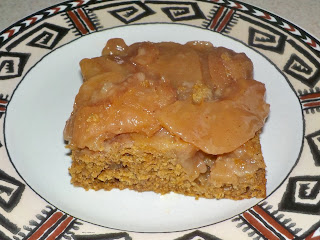
Oh, so back to that apple pie filling I told you how to make; or used store bought, but spice it up with more cinnamon; cloves are nice, maybe a dash of cardamom.  After putting the cake batter together, first spread out the pie filling on the bottom of the pan, then spread the batter over it.  Let it cool completely, loosen the sides of the cake, and flip it out onto a serving dish…Upside Down Apple Gingerbread Cake!

Between the scent and the taste, you will have a warm fuzzy feeling throughout, and might not even need a blanket to feel cozy as the outside temperature begins to cool.

Mary Cokenour

Wednesday, September 14, 2022

Reversal of Fortune, Butter into Cream.

 “If you’re afraid of butter, use cream."

 "The only real stumbling block is fear of failure. In cooking you've got to have a what-the-hell attitude."

 Quotes from the famous master chef, Julia Child


Depending on the recipe, there are often times that cream, whether half n’ half or heavy, can be substituted for butter.  Then again, what is butter, but emulsified fat globules from the churning of milk or cream. In using cream, there is a satisfying smoothness that coats the tongue, whereas butter can be an unsatisfactory oil.

One of my favorite recipes is piccata which, in Italian, translates to “larded”.  It is a technique where chicken or firm fish is sliced thin, coated in flour, browned in oil, and finished off in a sauce of butter, lemon juice, and capers.  What are capers? They are berries that have a lemon tang, yet the flavor of olives that have been brined, aka salty.  They are more often found in Mediterranean and Middle Eastern recipes, since they grow primarily in those areas.

However, in France, piccata refers to the word “pique” which means “sharp”, and the sauce is made with butter, lemon juice and spices; no capers. The cooking style of dredging in flour and frying though is the same.  So, whether you travel to Italy or France, definitely try piccata, but expect a sincere difference in sauces.

Now, I am not afraid of butter, as Julia Child’s quote might imply, but I do enjoy experimenting in the kitchen.  I believe most of my experiments come from, “I have this (insert name of food item) in the fridge or pantry, and I wonder what would happen if I substituted it for…?”  It is a curiosity behavior inherent in the human psyche.  How else would we have all our modern benefits, such as the wheel, exist, if we were not curious beings?

So, instead of traditional butter, and a couple of minor adjustments, my chicken piccata found itself draped in a creamy lemon sauce.  As side dishes, I took a 16-ounce bag of frozen California Mix vegetables, added a cup each of julienned bell peppers (more colors the prettier it looks) and onions.  The vegetables were stir-fried in two tablespoons of olive oil, seasoned with salt, ground black pepper and a couple of dashes of garlic powder.

The other side dish was a saffron rice; 2 cups of rice, cooked in 4 cups of chicken broth with 10 strands of saffron.   What is saffron?  A spice collected from the saffron crocus; the threads/strands are the stigma.  The taste is sweet and floral while saffron that tastes bitter, metallic, or plastic-like are cheap imitations that should be avoided.  This spice is rather expensive, so a substitute for the 10 threads is ½ teaspoon turmeric plus ½ teaspoon paprika.  The use of chicken broth diluted the saffron’s red color, so the rice allowed the vegetables to pop their colors on the plate, yet was still a delicious addition.

In one month’s time, I needed to make this dish twice, as Roy became addicted to it.  The tanginess of the lemon, the smoothness of the creamy sauce; oh yes, you will want to lick that plate clean!  Not telling if Roy did that, I will just leave it to your imagination.


Meals becoming a little boring, or need a wow factor for guests?  Try Chicken in Creamy Lemon Sauce, and wake up your, and everyone else’s, taste buds.


Chicken in Creamy Lemon Sauce

 Ingredients:

4 boneless, skinless chicken breasts, cut in half lengthwise

1 tsp. salt

½ tsp. ground black pepper

2 Tbsp. paprika

3 Tbsp. olive oil

1/3 cup white wine vinegar

1/3 cup lemon juice

¼ cup chicken stock

1 Tbsp. flour

1 cup half n’ half

Preparation:

 Mix together salt, pepper and paprika and season one side of the split chicken breasts.  Heat olive oil, medium-high heat, in large skillet, and brown chicken, 5 minutes, on both sides.  Add vinegar and lemon juice, cover skillet and let simmer for 5 minutes.  Remove chicken to plate.


Raise heat to high, add chicken stock and flour, whisk till smooth. Add half n’ half, bring to boil; whisk until smooth and creamy.  Spoon sauce over chicken.

Makes 8 servings.

Mary Cokenour


Wednesday, September 7, 2022

The Science of Brining.

In celebration of young children, teens, and adults returning to school, let’s talk science; the science of brining food.  I promise not to do a Thomas Dolby on you, and blind you with science.

“What is the science behind brining meat?  Osmosis is the diffusion of water through a semi-permeable membrane - in this case the meat cells. Through diffusion, the salt and water within the meat cells balance with the salt and water in the surrounding brine which results in a higher concentration of salt and water in the meat.” (https://www.kqed.org/quest/4441/the-science-behind-brining)

The typical “meat” products that benefit from brining are pork, poultry (mainly chicken and turkey), and some types of fish (cod, salmon, swordfish).  Why brine?  The process is not simply an exchange of salt and water.  It also causes a breakdown of muscle fibers, and a loosening of protein, which is essentially the process for tenderization.  Afterwards, when seasoning is added, the “meat” absorbs more, and distributes throughout.

The process of brining, aka pickling, can be traced back to 2400BCE, in ancient Mesopotamia.  This was a main method of food preservation, since refrigeration was basically slim to none.  Yes, clay pots could be coated on the inside, buried deep into the ground, or within tombs; but again, not widely available to the masses. 

Brining was not always a “wet method” either, as “dry brining” is the application of thick layers of salt.  Take, for example, baccala; dried and salted cod, often referred to as salt cod, saltfish or salt dolly.  This fish is usually served, in Italian culture, on Christmas Eve, during the Feast of the Seven Fishes.  The precooking prep is lengthy; “At least two days prior to cooking (but we recommend 3 days), you should begin soaking your salted baccalà in fresh water (at least 36-48 hours). First wash the pieces thoroughly, eliminating all the salt on the surface, and then completely submerge in any container that will hold a lot of water; change the water at least three times a day (every eight hours or even more frequently). “(https://www.delallo.com/blog/how-to-christmas-eve-baccal/)

When it comes to pork, it benefits from brining as it can be very bland in taste, and very tough if overcooked.  Now, once brined, do not be turned off by the whitish and pruney texture of the meat.  Remember, after sitting in water too long, we humans tend to look exactly like that.  After pigs, to cannibals, we are “the other white meat”.

Anyway, pork ribs are the number one section, of the pig, that is usually seen on a grill.  However, pork chops and tenderloins can be a delicious addition to your grilling repertoire.  The average pork tenderloin is 1 to 1 and ½ lbs., looks like a footlong cylinder, and has very little fat, if trimmed correctly by the butcher.  Packages of 2 to 3 lbs. typically contain 2 tenderloins of close to equal weight.  Brining, marinating in a dry rub, and slow roasting on the grill will create a tender, juicy meat packed with flavor.  As with ribs, adding a barbecue sauce is an option.  We usually do as it enhances the flavor of any side dish inhabiting the fork, at the same time as the meat.  The flavors and textures blend in the mouth, and Boom! a full culinary explosion!


Dry Rub BBQ Pork Tenderloin


Ingredients:

3 lb. package (2-1 and ½ lbs. sections) pork tenderloin

For the Brine

Water

2 Tbsp. salt

¼ cup white wine vinegar

For the Dry Rub

1 cup brown sugar

½ tsp. ground black pepper

2 tsp. paprika

2 tsp. New Mexico chile powder


BBQ Sauce - Sweet Baby Ray’s Honey Barbecue or Sweet and Spicy

Preparation:

Place the pork in a large, sealable plastic container; add enough water to cover.  Sprinkle salt over the water, and pour in vinegar; cover, place in refrigerator for 12 hours, or overnight.

Mix together all ingredients for dry rub.  Lay out two pieces of plastic wrap, at least 4 inches longer than each tenderloin.  Spoon a line of dry rub over center of each piece of wrap; place tenderloin over rub; sprinkle remaining rub over top of each tenderloin.  Wrap tightly, place in refrigerator for 12 hours, or overnight.


 Preheat outdoor grill to 300F.  Place aluminum foil on grill; place tenderloin on foil, and pour any juices, from plastic wrap, over the pork.  Close grill and let cook for 15 minutes.  Open grill lid, turn pork over, close lid and cook another 15 minutes.  Open lid, turn over pork, and baste with barbeque sauce; close lid, cook for 5 minutes.  Repeat with other side of tenderloins.


Remove pork to cutting board, let rest for 10 minutes before slicing. Depending on thickness of slices, each tenderloin will make 4-6 servings.


“She blinded me with science

(She blinded me with science!)

And hit me with technology”

(She Blinded Me With Science - Thomas Dolby) 

I just could not resist!

Mary Cokenour